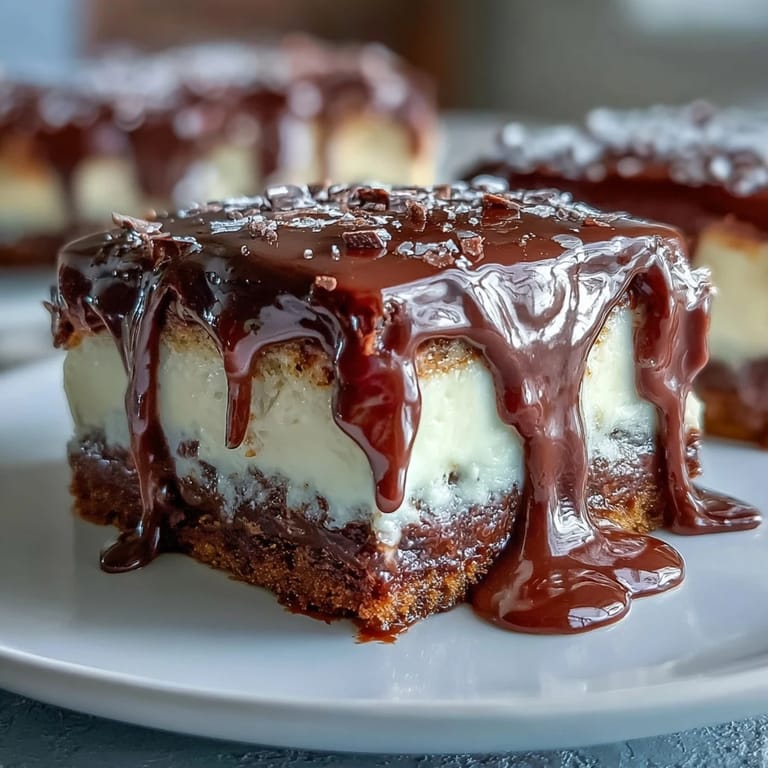
 Pin this
 My friend texted me a photo of her graduation cap mid-toss, and I knew exactly what I had to bake. There's something about white chocolate that feels celebratory—maybe it's the way it catches the light, or how it melts on your tongue with this delicate sweetness. I'd been nervous about the drip technique before, thinking it required some kind of pastry school certification, but after a few practice runs in my kitchen on a random Tuesday afternoon, I realized it was just about patience and letting gravity do most of the work. The gold balloon toppers were my sister's idea, whispered over coffee like we were plotting something mischievous, and they transformed the whole cake into something that looked like it belonged in a magazine.
I remember pulling this cake out of the fridge for my cousin's graduation party on a sweltering June evening, watching the buttercream hold its shape perfectly despite the kitchen heat. She took one bite and her eyes actually closed—that moment when someone tastes something that makes them forget to be polite and just feel the food. Her mom asked for the recipe right there at the table, mid-celebration, which I took as the highest compliment possible.
Ingredients
- All-purpose flour (2 ½ cups): Use the scoop-and-level method rather than scooping straight from the bag, which can pack the flour and make your cake dense.
- Baking powder (2 ½ tsp): Check your container's date—expired baking powder won't give you that signature tender crumb.
- Unsalted butter (1 cup + 1 cup for buttercream): Room temperature butter is non-negotiable; if it's too cold, you'll spend forever creaming it, and if it's too warm, your buttercream will break.
- Granulated sugar (2 cups): This sweetness balances the richness of the white chocolate and creates that fluffy crumb structure.
- Eggs (4 large): Room temperature eggs incorporate more smoothly into the batter, giving you better texture.
- Pure vanilla extract (1 tbsp + 1 tsp): The real stuff matters here—it's what gives the cake its sophisticated backbone.
- Whole milk (1 cup): Bringing milk to room temperature prevents it from shocking the warm batter and creating lumps.
- Powdered sugar (4 cups): Sift it before measuring to break up any clumps that could create a grainy buttercream.
- White chocolate (6 oz melted + 6 oz for drip): Quality matters with white chocolate since it's mostly cocoa butter; cheap versions can taste waxy.
- Heavy cream (2–3 tbsp + ¼ cup): This is your secret weapon for creating a silky buttercream that spreads like a dream.
- White chocolate crispy pearls or malt balls (1 cup): These become your edible gold balloons and add an unexpected textural element to the decoration.
- Edible gold spray or luster powder: A little goes a long way, and it transforms something simple into something that feels genuinely special.
Tired of Takeout? 🥡
Get 10 meals you can make faster than delivery arrives. Seriously.
One email. No spam. Unsubscribe anytime.
Instructions
- Prep your pans and heat your oven:
- Set your oven to 350°F and prepare three 8-inch round pans by greasing them and lining the bottoms with parchment—this step takes two minutes but saves you from cake disasters. Think of it as insurance for your celebration.
- Build your dry ingredients:
- Whisk flour, baking powder, and salt together in a medium bowl, making sure the baking powder is evenly distributed throughout. This little bit of prep work prevents you from having leavening pockets in random spots of your cake.
- Cream butter and sugar until clouds form:
- In a large bowl, beat softened butter and sugar for about three minutes—you're looking for pale, fluffy peaks that hold their shape, which means air is being incorporated. This aeration is what keeps your cake tender, so don't rush this step.
- Add eggs one at a time, then vanilla:
- Beat in each egg individually, waiting for it to fully incorporate before adding the next one; this creates an emulsion that helps your batter stay smooth. Pour in vanilla and mix until it's distributed evenly throughout.
- Alternate flour and milk in a gentle rhythm:
- Starting and ending with the flour mixture, add about a third of the dry ingredients, then half the milk, then another third of flour, then the remaining milk, then the final flour portion. Mix on low speed just until combined—overmixing activates gluten, which will make your cake tough.
- Divide and bake with confidence:
- Distribute the batter evenly among your three pans and smooth the tops with a spatula so they bake evenly. Bake for 30 to 35 minutes until a toothpick inserted in the center comes out clean, and your kitchen smells like vanilla paradise.
- Cool with patience:
- Let the cakes rest in their pans for 10 minutes—this allows them to set slightly so they don't fall apart when you turn them out. Transfer them to wire racks to cool completely, which takes about an hour but is absolutely necessary before frosting.
- Beat butter until it's silky smooth:
- For the buttercream, start by creaming butter alone for a minute or so until it's pale and fluffy. This gives it a head start on incorporating all the sugar that's about to go in.
- Add powdered sugar gradually while beating:
- Sift the powdered sugar directly into the mixer and beat it in slowly to avoid creating a cloud of sugar dust that coats your entire kitchen. You're building an emulsion here, just like before.
- Fold in white chocolate and cream for silk-like texture:
- Pour in your cooled melted white chocolate along with vanilla and salt, then beat until the mixture is light and fluffy. Add heavy cream a tablespoon at a time until you reach a spreadable consistency—it should be stiff enough to hold peaks but soft enough to work with a spatula.
- Level and layer with intention:
- If your cooled cakes have domed tops, use a serrated knife to level them so they stack evenly. Place the first layer on your serving plate or cake board, spread a generous layer of buttercream on top, and repeat until all three layers are stacked.
- Apply a crumb coat, then chill:
- Spread a thin layer of buttercream all over the assembled cake to seal in crumbs, then refrigerate for 30 minutes. This prevents crumbs from getting into your final frosting layer and marring the elegant finish.
- Create a smooth, professional-looking exterior:
- Apply a thick final coat of buttercream, using an offset spatula dipped in warm water to smooth it out. Take your time here—this is your canvas for the drip.
- Make ganache that pours like silk:
- Heat cream until it just barely simmers, pour it over chopped white chocolate, and let it sit for one minute to soften the chocolate. Stir until completely smooth and let it cool to room temperature—it should pour easily but not be hot enough to melt your buttercream.
- Drip with drama and intention:
- Using a spoon or squeeze bottle, pour the ganache around the top edge of the cake, letting gravity pull it down the sides in an organic, imperfect way. The imperfection is what makes it look real and beautiful, not stiff and artificial.
- Fill the center and smooth the top:
- Once you're happy with the side drips, pour the remaining ganache into the center of the cake and smooth it gently toward the edges. Let it set slightly before adding your balloon decorations.
- Transform pearls into gold balloons:
- Spray your crispy pearls or malt balls with edible gold spray in a well-ventilated area, or roll them in luster powder mixed with a touch of vodka for a subtle shine. Let them dry completely on parchment paper so they're ready to crown your cake.
- Assemble your celebration cake:
- Insert toothpicks or thin cake wires into the dried gold balloons and arrange them in a festive cluster on top of the cake, nestling them into the ganache. Chill the finished cake until serving time, then bring it to room temperature for the best flavor and texture.
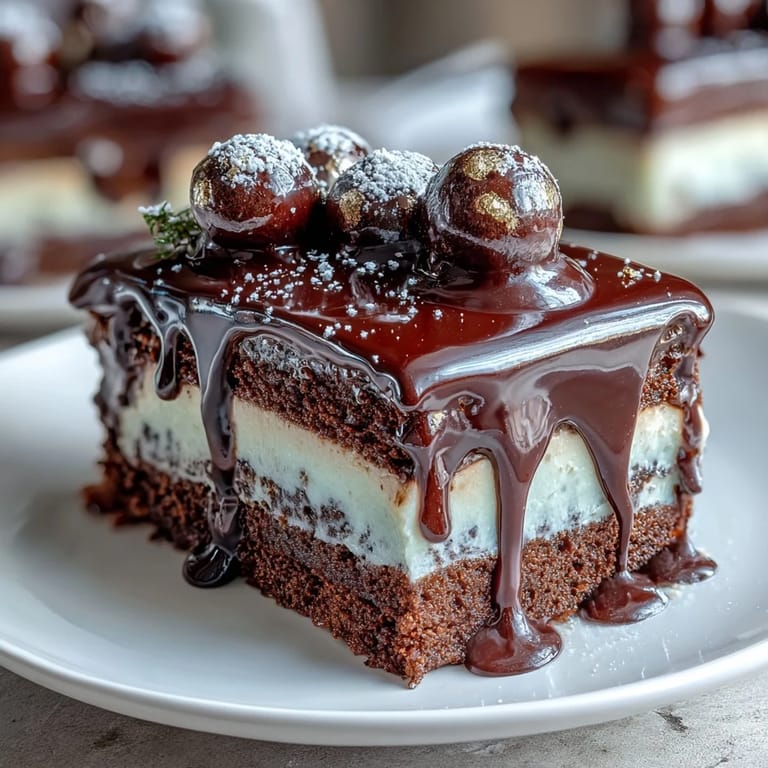 Pin this
 There's something magical about watching a cake you've made with your own hands become the centerpiece of someone's celebration. When my friend's little brother asked if he could take a piece to his college roommate across the country, carefully wrapped in a box, I felt like I'd done something that mattered beyond just feeding people—I'd created a memory they could share.
The White Chocolate Question
I spent an embarrassing amount of time researching white chocolate before making this cake, mostly because I wasn't sure if it would actually taste good. Turns out, the quality of your white chocolate makes an enormous difference—real white chocolate is made from cocoa butter, while cheaper versions use palm oil and other fillers. Once I switched to a decent brand, the buttercream tasted like actual white chocolate instead of sweet grease, and the whole cake elevated itself. Now I always check the ingredients list and buy from brands I recognize, which usually costs a dollar or two more but transforms the final product.
Timing and Temperature
The first time I made this cake, I forgot to let my ingredients come to room temperature and wondered why my buttercream looked broken and separated within minutes of mixing. I had to start over with new ingredients, which is how I learned this lesson the hard way, but now it's my first and most important step before I do anything else. I literally set out my butter, eggs, and milk first thing, then gather my other ingredients while I'm waiting—it adds maybe 15 minutes to prep time but saves you from frustration and wasted ingredients.
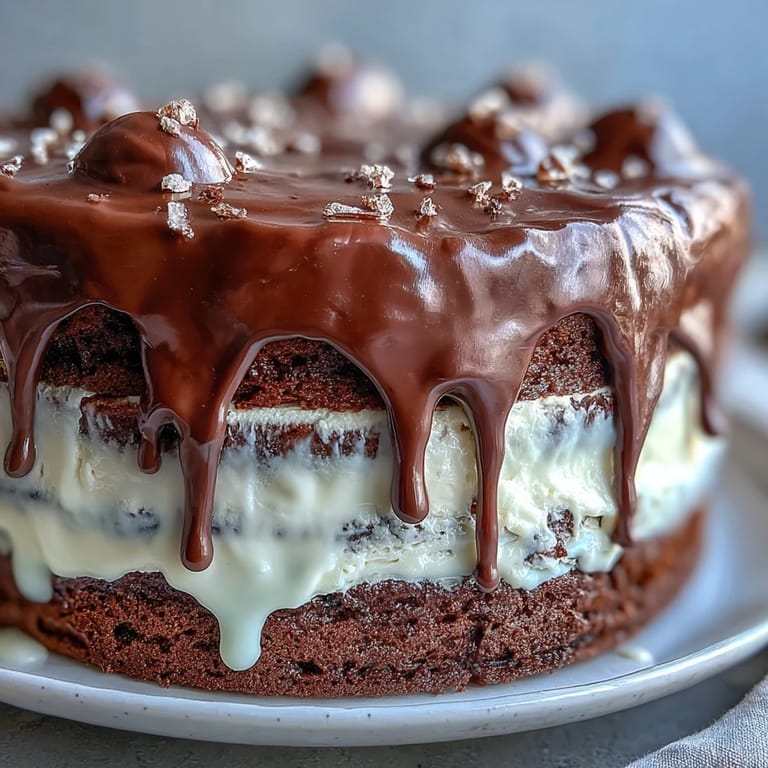
Decorating with Confidence and Flexibility
The gold balloon decoration might sound intimidating, but it's actually the most forgiving part of this cake because imperfection is the entire point. I've made this cake a dozen times now and never arranged the balloons the same way twice—sometimes they're clustered tight, sometimes they're spread out, sometimes they're wonky because a toothpick broke and I had to use wire instead. Every version looked beautiful because the gold just catches the light and makes whatever you do look intentional.
- Practice your ganache drip on a practice cake or even a bowl first if you're nervous about the technique.
- Edible gold spray goes a long way, so use light, quick bursts rather than heavy coats or your balloons will look wet and sticky.
- If you're making this cake ahead, store the finished decorated cake in the refrigerator and bring it out 30 minutes before serving so the buttercream reaches that perfect creamy texture.
 Pin this
 This cake has become my go-to celebration dessert because it feels fancy and impressive but doesn't require professional baking skills or impossible-to-find ingredients. Every time someone takes that first bite and their face lights up, I remember why I love baking—it's not about perfection, it's about creating something beautiful that brings people joy.
Recipe Questions
- → How do I achieve the perfect white chocolate drip?
Warm heavy cream just until simmering and pour over finely chopped white chocolate. Let it sit briefly, then stir gently until smooth before dripping it slowly over the cake edge.
- → What is the best way to keep the vanilla sponge moist?
Mix the batter gently to avoid overworking gluten, and ensure not to overbake. Cooling the layers completely before frosting helps maintain moisture.
- → Can I prepare the cake decorations in advance?
Yes, spray or dust the crispy pearls with edible gold and let dry fully before inserting them on toothpicks or wires. This can be done several hours ahead.
- → How should this cake be stored after assembling?
Refrigerate the cake wrapped loosely to preserve freshness. Bring it to room temperature before serving for optimal texture and flavor.
- → Are there any tips for layering the buttercream evenly?
Use an offset spatula to spread thin crumb coats and chill briefly. Then apply a thicker smooth coat and level layers carefully for a professional finish.