 Pin this
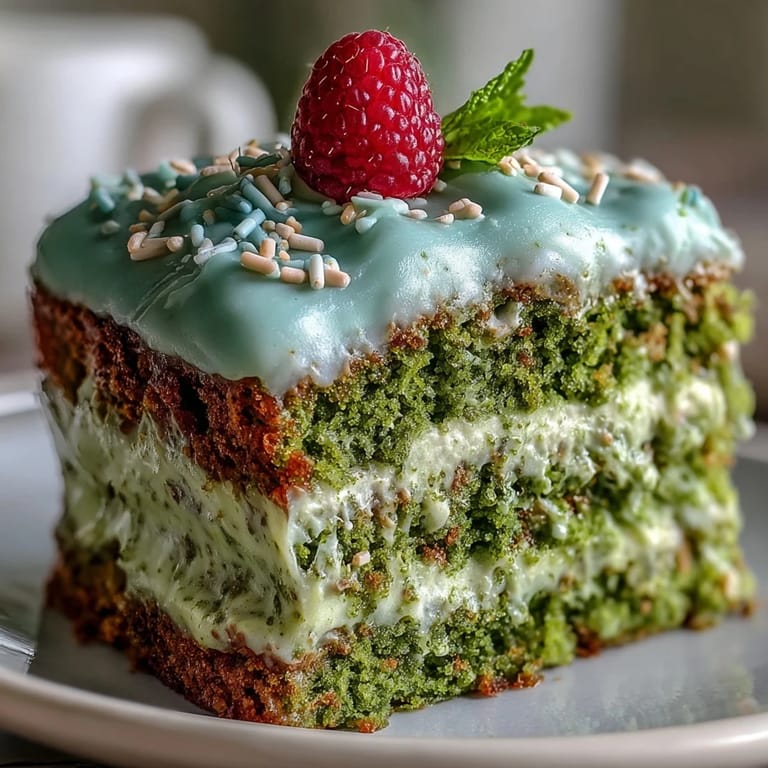
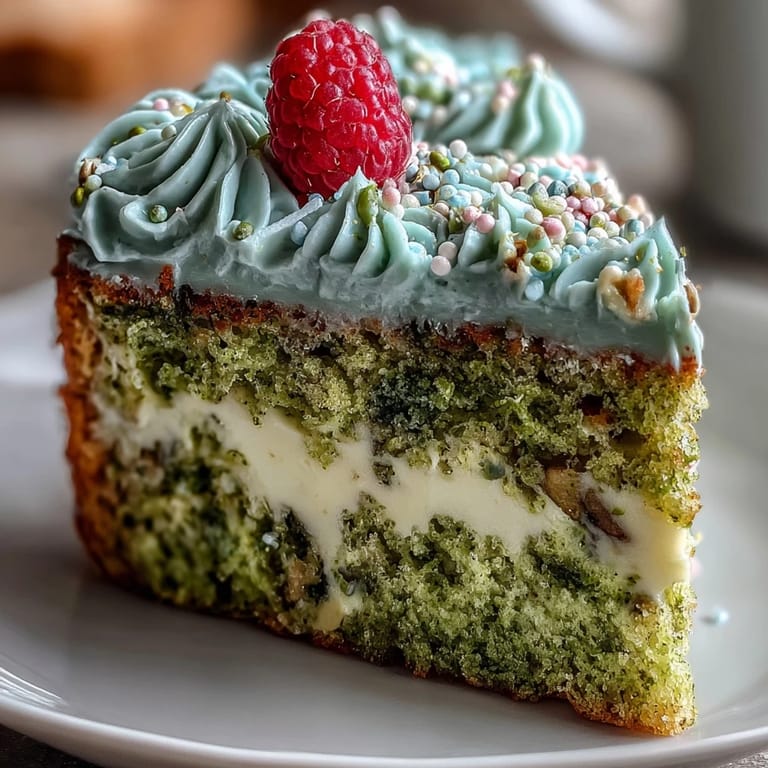
 The first time the idea for this matcha smash cake crossed my mind, I was standing in my quietly sunlit kitchen, eyeing a tin of vibrant green matcha powder left from a recent splurge. I’d always loved tiny cakes that felt like a celebration even before you broke them open. As the early spring breeze stirred the curtains, I envisioned a brunch where the cake was both centerpiece and playful activity. It’s hard to resist the charm of a petite layered dessert, especially when its color perks up the whole table. Sometimes, a big reason to bake is just to see everyone’s faces light up as they argue over who gets to make the first smash.
The morning I first made this for my friend’s birthday, the kitchen hummed with that unmistakable energy of anticipation—someone trying to pipe balloons, another sneaking fresh berries for the topping. I can still hear the laughter that followed as the cake was placed on the table, still a little warm, and everyone gently “smashed” it for their slice. It became more than just dessert; it was the best excuse for childlike fun among grownups.
Ingredients
- All-purpose flour: Provides the structure for a light crumb; I always sift it with the sugar and leaveners to keep the cake tender.
- Granulated sugar: Sweetens the cake without overwhelming matcha's delicate notes—a little less sugar won’t hurt if you prefer it subtle.
- Baking powder and baking soda: The dynamic duo for a fluffy rise; don’t skip sifting them in.
- Salt: Just a pinch amplifies every other flavor lurking in the bowl.
- Matcha powder (culinary grade): The star—sifting is especially crucial for matcha to avoid any stubborn green lumps.
- Whole milk (room temperature): Warmer milk helps everything blend smoothly (I learned the hard way with a few curdled batters).
- Large egg (room temperature): Adds richness; if it’s chilly from the fridge, run it under warm water for a minute.
- Vegetable oil: Gives the cake a soft moistness and means you don’t need to melt any butter.
- Vanilla extract: A tiny bit ties matcha and frosting together.
- Unsalted butter (softened): The secret to creamy frosting; under-softened butter just won’t whip as light.
- Powdered sugar (sifted): For that cloud-like, perfectly smooth icing.
- Milk (for frosting): Brings the frosting to spreadable consistency without making it runny.
- Pinch of salt (for frosting): It stops the buttercream from being cloyingly sweet.
- Sprinkles or fresh berries (optional): The finishing touch; let kids or guests scatter them for a bit of flair.
Tired of Takeout? 🥡
Get 10 meals you can make faster than delivery arrives. Seriously.
One email. No spam. Unsubscribe anytime.
Instructions
- Preheat and prepare pans:
- Start by heating your oven to 350°F 175°C. Grease and line two 4-inch pans—there’s a special satisfaction in peeling back parchment later.
- Sift and mix dry ingredients:
- Sift your flour, sugar, baking powder, baking soda, salt, and matcha powder into a bowl; the powdery green clouds always make me smile. Give everything a gentle whisk to combine.
- Combine wet ingredients:
- In a separate bowl, whisk together the milk, egg, oil, and vanilla until smooth and creamy. It’s important not to rush—enjoy the soft ripple of colors.
- Mix batter:
- Pour the wet mix into the dry and fold until just combined; a few streaks are fine. Overmixing can rob the cake of its fluffiness, so gentle is key.
- Divide and smooth:
- Spoon the fresh matcha batter into the pans, smoothing the tops with an offset spatula or the back of a spoon.
- Bake:
- Slide pans into the oven and bake 15–20 minutes, until a toothpick pulls out clean. The tops should spring back when lightly pressed.
- Cool cakes:
- Let them rest in the pans for 5 minutes, then turn out onto a wire rack. The waiting is the hardest part, as the sweet aroma fills the kitchen.
- Make frosting:
- Beat softened butter until it nearly turns pale, then gradually add powdered sugar. Add the milk, vanilla, and salt until you have a silky, pipeable frosting.
- Assemble cake:
- Spread frosting between the layers, then stack and smooth a gentle layer over the entire cake. Decorate with sprinkles or berries—chaotic creativity encouraged.
- Serve and celebrate:
- Set the cake at the center of your brunch spread and encourage everyone to “smash” or gently slice in. There’s no wrong way to enjoy it.
 Pin this
 The first time this little cake was demolished, someone insisted on using the back of a spoon like a miniature mallet. It was silly and spontaneous—everyone cheered, and for a moment, the brunch felt as carefree as a birthday party for kids. Even the crumbs were quickly scooped up. That sense of togetherness made me realize a smash cake isn’t just for turning a year older—it’s a reason to laugh and celebrate simple joys.
Choosing the Right Matcha
Culinary-grade matcha is best here—brighter in color and less bitter than its cheaper counterparts. I learned that old or poor-quality matcha turns the cake murky brown instead of green.
Decorating Without Fuss
Letting the frosting be a little rustic actually makes the cake look more inviting at brunch. A quick spiral with an offset spatula and a scattering of sprinkles transform every imperfection into charm.
Making It for All Diets
There are simple ways to swap the dairy for plant-based alternatives so everyone can join the smashing fun. I’ve found almond milk and vegan butter keep the cake moist and flavorful.
- If using vegan substitutions, check your matcha for added milk powder (some brands sneak it in).
- Non-dairy milk may need a tad less than dairy, so add gradually if the batter is thick.
- Letting the cake rest an extra 10 minutes ensures plant-based versions hold together when sliced or smashed.
 Pin this
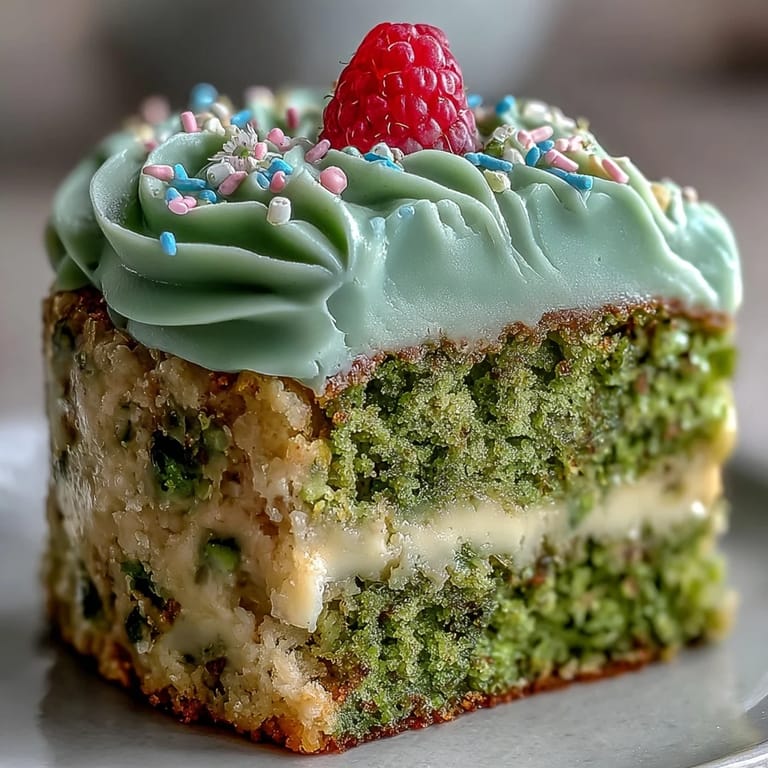
 Whether for a birthday or just a playful brunch, this mini matcha smash cake always invites laughter and a touch of mischief. Here’s to smashing, sharing and savoring every emerald-hued bite together.
Recipe Questions
- → How long should I bake the mini matcha layers?
Bake the 4-inch pans at 350°F (175°C) for 15–20 minutes. Start checking at 15 minutes; a toothpick inserted in the center should come out clean or with a few moist crumbs.
- → How can I make this dairy-free?
Substitute plant-based milk (soy, oat, or almond) for whole milk and use vegan butter in the frosting. Texture may be slightly different but the cake will remain tender.
- → How do I boost the matcha flavor without bitterness?
Use culinary-grade matcha and sift it to avoid clumps. Increase matcha by a half to one additional teaspoon for a stronger green tea note, and balance with the sweetness in the batter.
- → Any tips for a smooth vanilla frosting?
Beat softened butter until creamy, then gradually add sifted powdered sugar. Add milk and vanilla a little at a time to reach a spreadable consistency, and beat until light and fluffy to remove lumps.
- → How should I store leftovers?
Cover the cake loosely and refrigerate for up to 2 days. Bring to room temperature before serving to restore tenderness. For longer storage, freeze individual layers wrapped tightly for up to 1 month.
- → Any tricks for assembling the mini layers?
Level the tops if needed, spread a thin layer of frosting between layers to lock in crumbs, then chill briefly before applying the final thin crumb coat and smoothing the outer finish.